IPv6 neighbour proxy

When experimenting with IPv6 this weekend, I thought it would be cool to give my IPv4-only devices such as my webcam an IPv6 address.

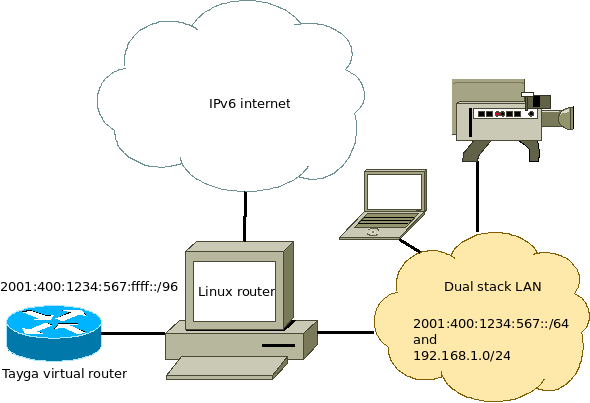
Using Tayga to do NAT64, I could route an IPv6 range to a virtual network interface where Tayga translates incoming packets to IPv4. As Tayga's documentation states: "You will need to select an unused /96 from your site's IPv6 address range which will be used as the NAT64 prefix." Unfortunately, I  only have one single /64 available, a range that should not be split.

What I did, was the following:

Diagram1

This is not really best practice, as hosts in the range 2001:400:1234:567:ffff:0:0:0 - 2001:400:1234:567:ffff:ffff:ffff:ffff  could be located on both the LAN and the Tayga virtual router, it's the only working method for the time being.

The Linux router sends packets for 2001:400:1234:567:ffff::/96 to Tayga instead of direcly to the lan. This works for outside hosts, but hosts on the LAN don't know that packets for this range should be sent to the Linux router.  They try to find my webcam on the LAN, but obviously can't find it.

Neighbour discovery

This looking for the webcam on the LAN is called neighbour discovery. The Neighbour Discovery Protocol performs functions similar to IPv4 ARP for finding other nodes on the same LAN. With above setup, the host at 2001:400:1234:567:ffff::1 is actually off the LAN. The Linux router must tell my laptop to send packets for this IP to the router.

proxy_ndp

You can do this using proxy_ndp, the IPv6 variant of proxy_arp. First enable proxy_ndp by running:

sysctl -w net.ipv6.conf.all.proxy_ndp=1

You can enable this permanently by adding the following line to /etc/sysctl.conf:

net.ipv6.conf.all.proxy_ndp = 1

Then run:

ip -6 neigh add proxy 2001:400:1234:567:ffff::1 dev eth0

This means for the Linux router to generate Neighbour Advertisement messages in response to Neighbour Sollicitation messages for 2001:400:1234:567:ffff::1 that enter through eth0. Note that 2001:400:1234:567:ffff::1 itself is not found on eth0, but on another virtual interface.

ndppd - NDP Proxy Daemon

While proxy_arp could be used to proxy a whole subnet, this appears not to be the case with proxy_ndp. To protect the memory of upstream routers, you can only proxy defined addresses. There is a daemon that can proxy a whole subnet, ndppd. It's available at
http://priv.nu/projects/ndppd/.

Links

Another interesting page on this subject is found at:
http://linux-attitude.fr/post/proxy-ndp-ipv6
(French, use google translate) - multiple /64's in a /56

http://wiki.stocksy.co.uk/wiki/IPv6%2BXen_on_a_Hetzner_server_with_routing_to_dummy0_and_proxy_ndp - exactly what I'm doing, but for other purposes. Just found this page after typing my own.

© GeekLabInfo IPv6 neighbour proxy is a post from GeekLab.info. You are free to copy materials from GeekLab.info, but you are required to link back to http://www.geeklab.info

1 Star2 Stars3 Stars4 Stars5 Stars (No Ratings Yet)
Loading...

IPv6 privacy

On most Linux distributions, the right hand part of the IPv6 address is based on the computer's MAC address. As your MAC address is fixed and (in theory) worldwide unique, your computer can be traced anywhere it goes online. While cookies track you all the time, stil having another tracker around is not desired.

The "IPv6 Privacy Extensions" fix this by giving you a regularly changed random IPv6 address.

To enable IPv6 Privacy Extensions, edit the file /etc/sysctl.conf and add these lines:

net.ipv6.conf.wlan0.use_tempaddr = 2
net.ipv6.conf.eth0.use_tempaddr = 2
net.ipv6.conf.all.use_tempaddr = 2
net.ipv6.conf.default.use_tempaddr = 2

Still, whenever you go online on a browser that carries your cookies/flash cookies/zombie cookies/supercookies, you may be identified. But at least, it's a little harder to track you.

© GeekLabInfo IPv6 privacy is a post from GeekLab.info. You are free to copy materials from GeekLab.info, but you are required to link back to http://www.geeklab.info

1 Star2 Stars3 Stars4 Stars5 Stars (1 votes, average: 4.00 out of 5)
Loading...

Squid with active directory authentication on Centos 6.0

In this post, I'll be writing down all steps required to build a Squid proxy server on a clean "minimal" installation of CentOS 6.0

Step 1. Network configuration

First, install system-config-network or manually configure the network. I prefer system-config-network for easy configurations and vim for more complex configurations.
yum -y install system-config-network-tui

Step 2. Install some tools for convenience

yum -y install vim-minimal vim-enhanced openssh-clients mc telnet policycoreutils policycoreutils-python bind-utils

Step 3. Install ntp and synchronize clocks

If one of the clocks it out of sync, NTLM authentication will not work. Therefore, we synchronize the clocks. Using pool.ntp.org as a source would be good, but if the AD server isn't synchronized with that source, we'd have the same problem. So I'm synchonizing the proxy to the AD server (Win2003SBS actually) instead:
rpm -q ntp || yum -y install ntp
sed -i "s/^server /#server /g" /etc/ntp.conf
echo "server AD-SERVERNAME" >> /etc/ntp.conf
ntpdate AD-SERVERNAME #synchronize right now
service ntpd start #and keep in sync
chkconfig ntpd on

Step 4. Install squid and other required software

yum -y install krb5-workstation samba-common samba-winbind authconfig squid
chkconfig squid on

Step 5. Connect to active directory

Please note that MYCOMPANY.local and mycompany.local may be different domains due to the upper/lowercase.
ADSERVER=sbs.MYCOMPANY.local
DOMAIN=MYCOMPANY.local
WORKGROUP=MYCOMPANY
authconfig --enableshadow --enablemd5 --passalgo=md5 --krb5kdc=$ADSERVER \
--krb5realm=$DOMAIN --smbservers=$ADSERVER --smbworkgroup=$WORKGROUP \
--enablewinbind --enablewinbindauth --smbsecurity=ads --smbrealm=$DOMAIN \
--smbidmapuid="16777216-33554431" --smbidmapgid="16777216-33554431" --winbindseparator="+" \
--winbindtemplateshell="/bin/false" --enablewinbindusedefaultdomain --disablewinbindoffline \
--winbindjoin=Administrator --disablewins --disablecache --enablelocauthorize --updateall
service winbind restart
chkconfig winbind on

Give squid permissions to use winbind info:
usermod -G wbpriv squid

Now check your winbind connection using the following commands:
wbinfo -u
wbinfo -g

Step 6. Firewall

iptables -I INPUT -m tcp -p tcp --dport 3128 -j ACCEPT
/sbin/service iptables save

Step 7. Configure squid

I commented out this line from /etc/squid/squid.conf:
http_access allow localnet
That line would have allowed users from 10.0.0.0/8+172.16.0.0/12+192.168.0.0/16 and others to use the proxy without authentication. Then I added the following right below that line:
acl whitelist dstdom_regex -i "/etc/squid/whitelist"
http_access allow whitelist
auth_param ntlm program /usr/bin/ntlm_auth --helper-protocol=squid-2.5-ntlmssp
auth_param ntlm children 5
auth_param ntlm keep_alive on
acl our_networks src 192.168.0.0/16
acl ntlm proxy_auth REQUIRED
http_access allow our_networks ntlm
authenticate_ip_ttl 900 seconds

This will allow all valid, logged in users to surf the web. You could also limit which users can surf by adding --require-membership-of=ADGROUPNAME to the ntlm_auth command

The first two lines of above configuration point to a file /etc/squid/whitelist. This file contains domains that should never be denied. My whitelist file contains:
\.trendmicro\.com
^trendmicro\.com
\.microsoft\.com
^microsoft\.com

This means that anything at *.microsoft.com and microsoft.com (without subdomain) as well as *.trendmicro.com as trendmicro.com (my virusscanner) is always allowed for any user. We wouldn't want to block important updates.

Start Squid using /sbin/service squid restart and the proxy is ready.

Step 8. Optional: IPv6 issues

I've been experimenting with IPv6 for a while now, but I don't have IPv6 available on all systems. That caused me some trouble with the next step. I had to give preference to IPv4 above IPv6 by editting /etc/gai.conf:
label ::1/128 0
label ::/0 1
label 2002::/16 2
label ::/96 3
label ::ffff:0:0/96 4
label fec0::/10 5
label fc00::/7 6
precedence ::ffff:0:0/96 100
precedence ::1/128 50
precedence ::/0 40
precedence 2002::/16 30
precedence ::/96 20

Step 9. Optional: Some white- and blacklisting

We may not want to allow all sites to be visited. For instance, porn sites are often blocked in office situations. I've got a manual on blacklisting using SquidGuard as well.

© GeekLabInfo Squid with active directory authentication on Centos 6.0 is a post from GeekLab.info. You are free to copy materials from GeekLab.info, but you are required to link back to http://www.geeklab.info

1 Star2 Stars3 Stars4 Stars5 Stars (2 votes, average: 5.00 out of 5)
Loading...

Native IPv6: First steps

Today I made my first native IPv6 connection. I've been running Teredo/Miredo on my laptop for quite a while now, and I thought it was time to get a real IPv6 connection. I could use IPv6 autoconfiguration, but on a server you need a fixed IP.

Needed software

Install required packages that are not included in the Fedora default install:
yum install iproute2 ndisc6

Configuring manually

Configuring the network is not that much different from configuring an IPv4 address.

IPv4IPv6
ip addr add 1.2.3.4/24 dev eth0ip addr add 2001:1BE8:DEAD:BEEF::1a1a/64 dev eth0
ip route add default via 1.2.3.254ip route add default via 2001:1BE8:DEAD:BEEF::1

Now test it by pinging/tracerouting some known IPv6 services:

[root@localhost ~]# ping6 ipv6.google.com
PING ipv6.google.com(2a00:1450:8003::69) 56 data bytes
64 bytes from 2a00:1450:8003::69: icmp_seq=1 ttl=58 time=7.19 ms
64 bytes from 2a00:1450:8003::69: icmp_seq=2 ttl=58 time=7.52 ms
64 bytes from 2a00:1450:8003::69: icmp_seq=3 ttl=58 time=6.98 ms
64 bytes from 2a00:1450:8003::69: icmp_seq=4 ttl=58 time=7.44 ms
^C
--- ipv6.google.com ping statistics ---
4 packets transmitted, 4 received, 0% packet loss, time 3003ms
rtt min/avg/max/mdev = 6.989/7.287/7.525/0.227 ms
[root@localhost ~]# tracert6 ipv6.google.com
traceroute to ipv6.google.com (2a00:1450:8003::69) from 2001:1be8:dead:beef::1a1a, 30 hops max, 60 bytes packets
1 2001:1be8:dead:beef::1 (2001:1be8:3f03:541::1) 1.024 ms 0.970 ms 1.036 ms
2 2001:1be8::310:1 (2001:1be8::310:1) 2.618 ms 2001:1be8::300:1 (2001:1be8::300:1) 2.583 ms 2001:1be8::310:1 (2001:1be8::310:1) 2.527 ms
3 pr61.ams04.net.google.com (2001:7f8:1::a501:5169:1) 2.865 ms 2.536 ms 2.184 ms
4 2001:4860::1:0:4b3 (2001:4860::1:0:4b3) 2.801 ms 3.156 ms 24.731 ms
5 2001:4860::2:0:66e (2001:4860::2:0:66e) 7.021 ms 6.830 ms 96.541 ms
6 2001:4860:0:1::31 (2001:4860:0:1::31) 7.092 ms 7.367 ms 12.089 ms
7 2a00:1450:8003::69 (2a00:1450:8003::69) 6.996 ms 7.550 ms 7.341 ms

Configure at boot time

Step 1. Enable IPv6 networking

vim /etc/sysconfig/network
then add (or replace):
NETWORKING_IPV6=yes

Step 2. Configure IPv6 addresses

vim /etc/sysconfig/network-scripts/ifcfg-eth0
then add the following lines:
IPV6INIT=yes
IPV6ADDR=2001:1BE8:DEAD:BEEF::1a1a/64
IPV6_DEFAULTGW=2001:1BE8:DEAD:BEEF::1

Step 3. Test

Run service network restart or reboot to test.
Warning: if you do this remotely, you may lose the connection. I first locked myself out of my test machine, but I always got a KVM switch attached or VMWare console.

Security

Please remember that using IPv6 also means that there's a new entrance to your network. Use ip6tables to set up a firewall.

Ubuntu/Debian

I'm running RedHat-based software on all of my machines. Above information may be useful for Ubuntu/Debian users, but it's not tested and I'm not supporting it.

Servers: RedHat Enterprise Linux/CentOS is more suitable for servers, as there's a lot of professional level support available. I think that's important, because if I say, get a car accident, I want the servers to be managable by another professional.

Desktops/Laptops: RPM packages are pretty exchangable between RedHat-based platforms. That's a good reason to run Fedora on the desktop.
© GeekLabInfo Native IPv6: First steps is a post from GeekLab.info. You are free to copy materials from GeekLab.info, but you are required to link back to http://www.geeklab.info

1 Star2 Stars3 Stars4 Stars5 Stars (No Ratings Yet)
Loading...