DNS and multiple VPNs: Using dnsmasq to access multiple dns suffixes

On my Fedora 15 laptop, I'm almost always connected to several VPNs simultaneously. One VPN to my office or to my home (depending on where I am), one to the data center, one to a customer. These connections all have their own DNS server with their own suffix.

To make all dns suffixes working, I created a script that redirects all outgoing DNS traffic to dnsmasq running on localhost, which in turn forwards all requests for .lan to 192.168.15.254 and all requests for .gl to 192.168.1.254.

The script was put in /etc/NetworkManager/dispatcher.d/10-DNS:

if [ -e /var/run/dnsmasq.localhost ]; then
        cat /proc/`cat /var/run/dnsmasq.localhost`/cmdline |grep dnsmasq >/dev/null 2>/dev/null && \
        kill `cat /var/run/dnsmasq.localhost`
fi
 
if [ "$2" == "up" ]; then
        cp /etc/resolv.conf /etc/resolv.conf.dhcp
        echo nameserver 127.0.0.1 >  /etc/resolv.conf
        echo domain $DHCP4_DOMAIN_NAME >> /etc/resolv.conf 
        echo search $DHCP4_DOMAIN_NAME >> /etc/resolv.conf 
        /usr/sbin/dnsmasq -C /dev/null -r /etc/resolv.conf.dhcp --server=/gl/192.168.1.254 \
            --server=/lan/192.168.15.254 --bind-interfaces --listen-address 127.0.0.1 \ 
            --pid-file=/var/run/dnsmasq.localhost
fi

Once I had to fix resolv.conf manually when I connected my laptop to my Samsung Galaxy SII as well. This may mean I need to improve the script some day, but for the time being, it works good enough.

© GeekLabInfo DNS and multiple VPNs: Using dnsmasq to access multiple dns suffixes is a post from GeekLab.info. You are free to copy materials from GeekLab.info, but you are required to link back to http://www.geeklab.info
1 Star2 Stars3 Stars4 Stars5 Stars (No Ratings Yet)
Loading...

SELinux: Running OpenVPN on a different port

To allow OpenVPN to run on a different port than 1194, you'll need to tweak your SELinux permissions:
/usr/sbin/semanage port -a -t openvpn_port_t -p udp 61616

© GeekLabInfo SELinux: Running OpenVPN on a different port is a post from GeekLab.info. You are free to copy materials from GeekLab.info, but you are required to link back to http://www.geeklab.info

1 Star2 Stars3 Stars4 Stars5 Stars (No Ratings Yet)
Loading...

Reconfigure nspluginwrapper

Yay, I just upgraded my nspluginwrapper and everything broke. Again. Couldn't use youtube or any of my other favorite sites anymore.

Running firefox from the console gave me some feedback:

*** NSPlugin Viewer  *** ERROR: NP_Initialize() get args: Message argument mismatch
*** NSPlugin Viewer  *** ERROR: rpc_end_sync called when not in sync!
*** NSPlugin Wrapper *** ERROR: NP_Initialize() wait for reply: Connection closed
NOTE: child process received `Goodbye', closing down

When I google'd around a bit, I found some commands for older/different versions of nspluginwrapper. Finally, I tried the parameters of the old binary on the new binary:
/usr/lib64/nspluginwrapper/npconfig -a -v -i
and got the output:

Auto-install plugins from /usr/lib/mozilla/plugins
Looking for plugins in /usr/lib/mozilla/plugins
Install plugin /usr/lib/mozilla/plugins/libflashplayer.so
  into /home/username/.mozilla/plugins/npwrapper.libflashplayer.so
Auto-install plugins from /usr/lib64/mozilla/plugins
Looking for plugins in /usr/lib64/mozilla/plugins
*** NSPlugin Viewer  *** ERROR: /usr/lib64/mozilla/plugins/libtotem-gmp-plugin.so: wrong ELF class: ELFCLASS64
Install plugin /usr/lib64/mozilla/plugins/libtotem-gmp-plugin.so
  into /home/username/.mozilla/plugins/npwrapper.libtotem-gmp-plugin.so
*** NSPlugin Viewer  *** ERROR: /usr/lib64/mozilla/plugins/skypebuttons.so: wrong ELF class: ELFCLASS64
Install plugin /usr/lib64/mozilla/plugins/skypebuttons.so
  into /home/username/.mozilla/plugins/npwrapper.skypebuttons.so
*** NSPlugin Viewer  *** ERROR: /usr/lib64/mozilla/plugins/libtotem-cone-plugin.so: wrong ELF class: ELFCLASS64
Install plugin /usr/lib64/mozilla/plugins/libtotem-cone-plugin.so
  into /home/username/.mozilla/plugins/npwrapper.libtotem-cone-plugin.so
*** NSPlugin Viewer  *** ERROR: /usr/lib64/mozilla/plugins/librhythmbox-itms-detection-plugin.so: wrong ELF class: ELFCLASS64
Install plugin /usr/lib64/mozilla/plugins/librhythmbox-itms-detection-plugin.so
  into /home/username/.mozilla/plugins/npwrapper.librhythmbox-itms-detection-plugin.so
*** NSPlugin Viewer  *** ERROR: /usr/lib64/mozilla/plugins/libtotem-narrowspace-plugin.so: wrong ELF class: ELFCLASS64
Install plugin /usr/lib64/mozilla/plugins/libtotem-narrowspace-plugin.so
  into /home/username/.mozilla/plugins/npwrapper.libtotem-narrowspace-plugin.so
*** NSPlugin Viewer  *** ERROR: /usr/lib64/mozilla/plugins/libtotem-mully-plugin.so: wrong ELF class: ELFCLASS64
Install plugin /usr/lib64/mozilla/plugins/libtotem-mully-plugin.so
  into /home/username/.mozilla/plugins/npwrapper.libtotem-mully-plugin.so
*** NSPlugin Viewer  *** ERROR: /usr/lib64/mozilla/plugins/libjavaplugin.so: wrong ELF class: ELFCLASS64
Install plugin /usr/lib64/mozilla/plugins/libjavaplugin.so
  into /home/username/.mozilla/plugins/npwrapper.libjavaplugin.so
Auto-install plugins from /home/username/.mozilla/plugins
Looking for plugins in /home/username/.mozilla/plugins
Install plugin /home/username/.mozilla/plugins/libflashplayer.so
  into /home/username/.mozilla/plugins/npwrapper.libflashplayer.so
*** NSPlugin Viewer  *** ERROR: /home/username/.mozilla/plugins/libnpgoogletalk64.so: wrong ELF class: ELFCLASS64
Install plugin /home/username/.mozilla/plugins/libnpgoogletalk64.so
  into /home/username/.mozilla/plugins/npwrapper.libnpgoogletalk64.so
*** NSPlugin Viewer  *** ERROR: /home/username/.mozilla/plugins/libnpgtpo3dautoplugin.so: wrong ELF class: ELFCLASS64
Install plugin /home/username/.mozilla/plugins/libnpgtpo3dautoplugin.so
  into /home/username/.mozilla/plugins/npwrapper.libnpgtpo3dautoplugin.so

After this, my Firefox was running as usual.

© GeekLabInfo Reconfigure nspluginwrapper is a post from GeekLab.info. You are free to copy materials from GeekLab.info, but you are required to link back to http://www.geeklab.info

1 Star2 Stars3 Stars4 Stars5 Stars (No Ratings Yet)
Loading...

Simple dual uplink configuration

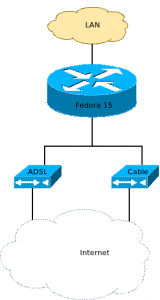
Last week I switched from ADSL to EuroDOCSIS cable. I couldn't just shut down the DSL connection as several services were still connecting to that IP. So I made my home router (Fedora 15) kind of multihomed.

Configuration

I haven't even taken the time to seperate the ADSL and cable modems, I just hooked them up to the same network interface. Of course, they got their own IP range.

ADSL modem: 192.168.2.254/24
Cable modem: 192.168.1.1/24

Step 1: Add ip
ip addr add 192.168.1.2 dev eth0

Step 2: Routing
By default we send all outgoing packages to the default gateway at 192.168.2.254. Only packets that are answers to incoming packets on the 192.168.1.x network must be routed back to 192.168.1.1
ip rule add from 192.168.1.0/24 lookup 1001
ip route add default gw 192.168.1.1 table 1001

That's all. Of course, above setup only takes care of answering to incoming packets. If you want to load-balance or have a fail-over setup, I suggest you read the Linux Advanced Routing & Traffic Control HOWTO.

© GeekLabInfo Simple dual uplink configuration is a post from GeekLab.info. You are free to copy materials from GeekLab.info, but you are required to link back to http://www.geeklab.info

1 Star2 Stars3 Stars4 Stars5 Stars (No Ratings Yet)
Loading...

Viewing a V4L2 webcam with mplayer

The great mplayer can be used to view movies, play dvd's, and even to watch the webcam. For my Logitech QuickCam Pro 4000, I use the following command:
mplayer -cache 128 -tv driver=v4l2:width=640:height=480:outfmt=i420 -vc rawi420 -vo xv tv://

If you have multiple v4l2 devices, you can choose which device you want to use by adding 'device=/dev/videoX' to the options:
mplayer -cache 128 -tv driver=v4l:width=640:height=480:outfmt=i420:device=/dev/video1 -vc rawi420 -vo xv tv://

© GeekLabInfo Viewing a V4L2 webcam with mplayer is a post from GeekLab.info. You are free to copy materials from GeekLab.info, but you are required to link back to http://www.geeklab.info

1 Star2 Stars3 Stars4 Stars5 Stars (2 votes, average: 2.50 out of 5)
Loading...

SELinux: Running samba unconfined

I don't want to disable SELinux, but i'm using samba to access about every file on the system. To run samba unconfined, change its context:
chcon -t unconfined_exec_t /usr/sbin/smbd
service smb restart

This works for other software as well.

Update: Another solution may be to run software in permissive mode. I just changed the mode of one postfix sub-program to permissive mode: semanage permissive -a postfix_pipe_t

© GeekLabInfo SELinux: Running samba unconfined is a post from GeekLab.info. You are free to copy materials from GeekLab.info, but you are required to link back to http://www.geeklab.info

1 Star2 Stars3 Stars4 Stars5 Stars (1 votes, average: 5.00 out of 5)
Loading...

Fedora 15: Nagios errors

Installation of Nagios on Fedora 15 is easy as yum install nagios nagios-plugins* php nrpe. I only found one problem: Error: Could not read object configuration data!

The webserver runs as user apache, which cannot access /etc/nagios/objects by default. Chmod or chown the directory to fix it, or add user apache to the group nagios.

You may also want to check the selinux settings, which can be restored by typing restorecon /etc/nagios

© GeekLabInfo Fedora 15: Nagios errors is a post from GeekLab.info. You are free to copy materials from GeekLab.info, but you are required to link back to http://www.geeklab.info

1 Star2 Stars3 Stars4 Stars5 Stars (7 votes, average: 5.00 out of 5)
Loading...

OpenVPN: script failed: could not execute external program

I've been using the great VPN software OpenVPN for a long time now. I just love it. Today, I copied the configuration of my old router to my brand new Fedora 15 box, and suddenly it can't start anymore.

In the logs I found this message:
script failed: could not execute external program

What does that mean?
Is the 'up' script not found? It it in the wrong directory? I could not just find it. Until I hooked up my favourite debugger tool: strace. And look what I found there:
[pid 8273] execve("./up", ["./up", "vpn", "1500", "1576", "", "", "init"], [/* 14 vars */]) = -1 ENOEXEC (Exec format error)

Solution

What is the case? In older OpenVPN versions, scripts where run by system(3), which uses the shell to run scripts. Newer versions are more secure, and use execl/execve or something like that. That means that shell scripts must explicitly tell the sytem that they're to be run by the shell.

So, add the following line to the top of the script:
#!/bin/bash
And you're done.

© GeekLabInfo OpenVPN: script failed: could not execute external program is a post from GeekLab.info. You are free to copy materials from GeekLab.info, but you are required to link back to http://www.geeklab.info

1 Star2 Stars3 Stars4 Stars5 Stars (9 votes, average: 4.11 out of 5)
Loading...

An Asterisk 1.8 fax server

To start, I setup a clean, minimal Fedora 15 installation.

Install requirements

After installation, we install a few more tools that we need:
yum install asterisk asterisk-fax #base
yum install perl-Email-MIME libtiff-tools #for mailer script
yum install telnet mc vim ntp rsync #for convenience and backup

Synchronize your time:
sntp -s pool.ntp.org

Configuration

On a clean asterisk installation, we only edit a few files.

sip.conf
Edit /etc/asterisk/sip.conf and make the following changes:

  • Look for ;faxdetect=yes and uncomment it by removing the ;
  • Somewhere under [global] put your register string. For example:
    register => myUsername:myPassword@12.34.56.78/31331234567
    In this example 12.34.56.78 is the ip of my SIP provider and 31331234567 my internationalized fax number.
  • At the bottom, add the following lines:
    [trunk-geeklab-9]
    username=myUsername
    type=peer
    secret=myPassword
    qualify=yes
    host=12.34.56.78
    canreinvite=yes
    context=geeklab-fax
    insecure=invite

extensions.conf
To /etc/asterisk/extensions.conf add the following lines:

[geeklab-fax]
exten => 331234567,1,Goto(inboundfax,s,1)
;This is the DID number my provider rings. I would
;prefer 3133123... or 033123... but that's just the
;way it is. Your provider may use another format.

[inboundfax]
;I could have merged this with [geeklab-fax] but i decided not to.
exten => s,1,NoOp(**** FAX RECEIVED from ${CALLERID(num)} ${STRFTIME(${EPOCH},,%c)} ****)
exten => s,n,Set(FAXOPT(ecm)=yes)
exten => s,n,Set(FILENAME=fax-${STRFTIME(${EPOCH},,%Y%m%d-%H%M%S)}-${CALLERID(num)})
exten => s,n,Set(FAXFILE=${FILENAME}.tif)
exten => s,n,Set(FAXOPT(ecm)=yes)
exten => s,n,Set(FAXOPT(headerinfo)=Received by MYCOMPANY ${STRFTIME(${EPOCH},,%Y-%m-%d %H:%M)})
exten => s,n,Set(FAXOPT(localstationid)=0331234567)
exten => s,n,Set(FAXOPT(maxrate)=14400)
exten => s,n,Set(FAXOPT(minrate)=2400)
exten => s,n,NoOp(FAXOPT(ecm) : ${FAXOPT(ecm)})
exten => s,n,NoOp(FAXOPT(headerinfo) : ${FAXOPT(headerinfo)})
exten => s,n,NoOp(FAXOPT(localstationid) : ${FAXOPT(localstationid)})
exten => s,n,NoOp(FAXOPT(maxrate) : ${FAXOPT(maxrate)})
exten => s,n,NoOp(FAXOPT(minrate) : ${FAXOPT(minrate)})
exten => s,n,NoOp(**** RECEIVING FAX : ${FAXFILE} ****)
exten => s,n,ReceiveFAX(/var/spool/asterisk/fax/${FAXFILE})
exten => s,n,Hangup()
exten => h,1,NoOp(FAXOPT(ecm) : ${FAXOPT(ecm)})
exten => h,n,system(/usr/local/bin/fax-process.pl --to yourname@geeklab.info --from fax@geeklab.info --subject "Fax from ${URIENCODE(${CALLERID(number)})} ${URIENCODE(${CALLERID(name)})}" --attachment ${FILENAME}.pdf --type application/pdf --file ${FAXFILE});

Inbound fax notification

When you get a fax, you'll probably want it in you mailbox. Download fax-process.txt and move it to /usr/local/bin/fax-process.pl. Make it executable using chmod 755 /usr/local/bin/fax-process.pl. If you haven't disabled SELinux, change the files security context by running: chcon system_u:system_r:asterisk_t:s0 fax-process.pl

Firewall

You won't get any calls if the firewall drops them. You may want a complex firewall. But since I'm using this virtual machine as a dedicated fax, I allow all from my SIP host and nothing from other hosts. Edit /etc/sysconfig/iptables to reflect your preferences. Mine are:

*filter
:INPUT ACCEPT [0:0]
:FORWARD ACCEPT [0:0]
:OUTPUT ACCEPT [59:6844]
-A INPUT -s 12.34.56.78 -p tcp -m tcp ! --dport 22 -j ACCEPT
-A INPUT -s 12.34.56.78 -p udp -m udp -j ACCEPT
-A INPUT -m state --state RELATED,ESTABLISHED -j ACCEPT
-A INPUT -p icmp -j ACCEPT
-A INPUT -i lo -j ACCEPT
-A INPUT -p tcp -m state --state NEW -m tcp -s my.ho.me.ip --dport 22 -j ACCEPT
-A INPUT -j REJECT --reject-with icmp-host-prohibited
-A FORWARD -j REJECT --reject-with icmp-host-prohibited
COMMIT

You're done

Start asterisk by running service asterisk start and you're good to go.

© GeekLabInfo An Asterisk 1.8 fax server is a post from GeekLab.info. You are free to copy materials from GeekLab.info, but you are required to link back to http://www.geeklab.info

1 Star2 Stars3 Stars4 Stars5 Stars (5 votes, average: 2.40 out of 5)
Loading...

Lovelock: Mozilla as default browser from Thunderbird

Last week, I upgraded to Fedora 15 (codename: Lovelock). One of the new annoying "features" is that Google Chrome somehow got to be the default browser when I click a link from Firefox.

I Google'd around, and couldn't find how to fix it. So I decided to strace it. Apparently, Thunderbird launches gvfs-open to open a browser. Again I straced the command "gvfs-open https://www.geeklab.info", and found that it opens /usr/local/share/applications/defaults.list, which referred to google-chrome.desktop instead of mozilla-firefox.desktop. My file now contains:

[Default Applications]
text/html=mozilla-firefox.desktop
text/xml=mozilla-firefox.desktop
application/xhtml_xml=mozilla-firefox.desktop
x-scheme-handler/http=mozilla-firefox.desktop
x-scheme-handler/https=mozilla-firefox.desktop
x-scheme-handler/ftp=mozilla-firefox.desktop

And it's fixed! :-)

Update: Since some crap keeps changing this file, i just made the file immutable. The command chattr +i /usr/local/share/applications/defaults.list prevents programs that would normally have permissions to edit the file to be blocked.

© GeekLabInfo Lovelock: Mozilla as default browser from Thunderbird is a post from GeekLab.info. You are free to copy materials from GeekLab.info, but you are required to link back to http://www.geeklab.info

1 Star2 Stars3 Stars4 Stars5 Stars (2 votes, average: 5.00 out of 5)
Loading...