Use dsacls to gain access to active directory policies

I've locked myself out of group policies a couple of times. When this happens to you, you can gain access again running the following command:

dsacls.exe "CN={GUID},CN=Policies,CN=System,DC=local" /R "Authenticated users"

© GeekLabInfo Use dsacls to gain access to active directory policies is a post from GeekLab.info. You are free to copy materials from GeekLab.info, but you are required to link back to http://www.geeklab.info

1 Star2 Stars3 Stars4 Stars5 Stars (No Ratings Yet)
Loading...

Konsole is driving me crazy!

Konsole, the terminal emulator of KDE, is driving me crazy! Version 4.8 made a slight change, that breaks an essential feature I'm using.

Up to version 4.7.x, I used the command konsole --profile=Profilename to open a terminal. Then I used ctrl+alt+N to open several terminals with the same profile. For some reason, this broke in version 4.8. Since I use this feature like every minute, I'm getting very frustrated by this.

Here comes the beauty of open source: since Konsole is open source, I can fix it myself.

My changes

First, I downloaded the current version of the konsole source RPM and installed it, using rpm -i konsole-4.8.1-1.fc16.src.rpm. In ~/rpmbuild/SOURCES I created a new file named newtab.patch, containing:

--- konsole-4.8.1/src/MainWindow.cpp    2012-02-29 23:56:57.000000000 +0100
+++ konsole-4.8.1/src/MainWindow.cpp    2012-04-03 19:47:52.397594047 +0200
@@ -397,7 +397,8 @@
 
 void MainWindow::newTab()
 {
-    Profile::Ptr defaultProfile = SessionManager::instance()->defaultProfile();
+    Profile::Ptr defaultProfile = MainWindow::defaultProfile();
+              //SessionManager::instance()->defaultProfile();  //Geeklab fix
     emit newSessionRequest(defaultProfile , activeSessionDir() , _viewManager);
 }

Then I editted konsole.spec, adding a line after the one that starts with Patch50:

Patch99: newtab.patch

After that, I added a line after the one that starts with %patch50:

%patch99 -p1 -b .newtab

And we're done. Build the RPM using the command rpmbuild -ba konsole.spec --define "dist geeklab" and install it.

Somehow, this RPM doesn't cover all of the problems, but enough for me to be happy.

© GeekLabInfo Konsole is driving me crazy! is a post from GeekLab.info. You are free to copy materials from GeekLab.info, but you are required to link back to http://www.geeklab.info

1 Star2 Stars3 Stars4 Stars5 Stars (No Ratings Yet)
Loading...

Check your PC after the Nu.nl hack

Yesterday, Dutch news site nu.nl was hacked. Unfortunately, they hardly inform the public of what exactly happened. But this site has a pretty good analysis and a page to check if you are vulnerable.

You can also use MS Safety Scanner to scan your computer, which is a good idea anyway.

I'm happy to say that my clients are all up-to-date and thus not infected.

© GeekLabInfo Check your PC after the Nu.nl hack is a post from GeekLab.info. You are free to copy materials from GeekLab.info, but you are required to link back to http://www.geeklab.info

1 Star2 Stars3 Stars4 Stars5 Stars (No Ratings Yet)
Loading...

How to generate SSH Fingerprint DNS records

ssh-keygen -f /etc/ssh/ssh_host_rsa_key.pub -r hostname
ssh-keygen -f /etc/ssh/ssh_host_dsa_key.pub -r hostname

You can put the output to your dns zone.

Continue Reading…

© GeekLabInfo How to generate SSH Fingerprint DNS records is a post from GeekLab.info. You are free to copy materials from GeekLab.info, but you are required to link back to http://www.geeklab.info

1 Star2 Stars3 Stars4 Stars5 Stars (1 votes, average: 5.00 out of 5)
Loading...

Open EPS files with GIMP for Windows

To open EPS files on GIMP for Windows, you'll need to install GhostScript. You can download GhostScript here. After installing, you'll also need to configure a system environment variable: GS_PROG. This variable must point to the executable, in my case C:\Program Files\gs\gs9.05\bin\gswin32.exe.

Setting the environment variable is done in the advanced settings of "my computer".

© GeekLabInfo Open EPS files with GIMP for Windows is a post from GeekLab.info. You are free to copy materials from GeekLab.info, but you are required to link back to http://www.geeklab.info

1 Star2 Stars3 Stars4 Stars5 Stars (No Ratings Yet)
Loading...

Setting up a PPTP VPN to a Windows 2008 Server

Requirements

Linux
KDE
A Windows server to connect to.

Step 1: Install required software

yum install kde-plasma-networkmanagement-pptp NetworkManager-pptp

Step 2: Configure the network

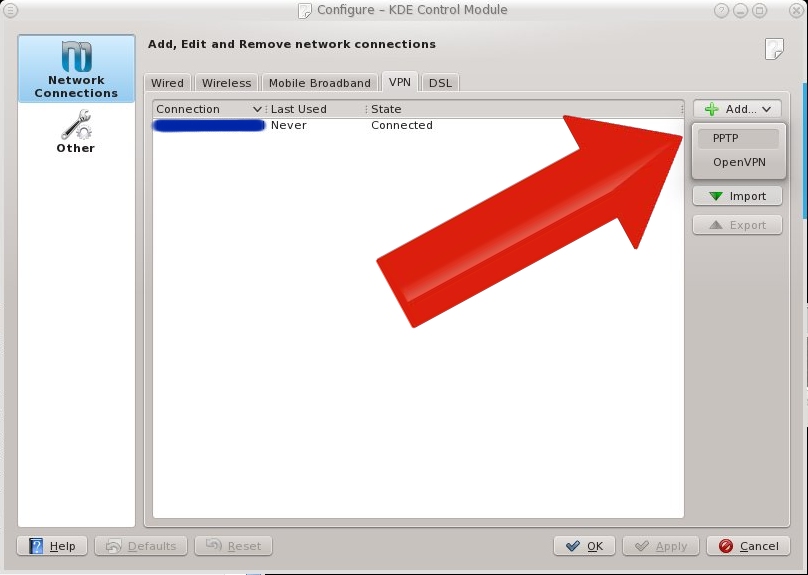
In the KDE Network Manager plasma module, go to the tab VPN, click add and choose PPTP.

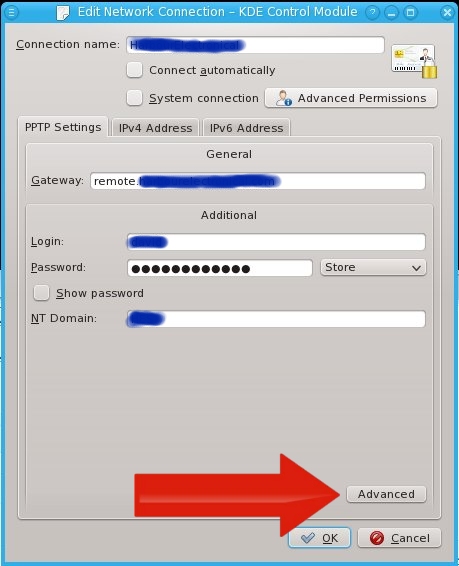
Enter and connection name you like. In the field "gateway" type the hostname or IP number of the Windows server you're connecting to. Under Login, Password and NT Domain, fill in your authentication data. Then click advanced.

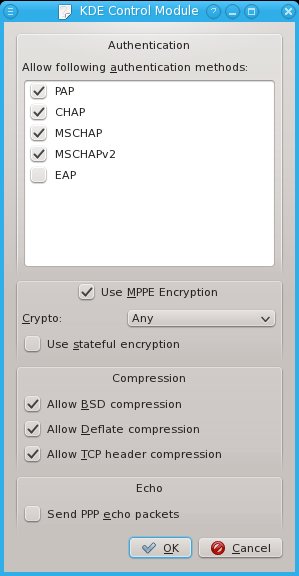
In the advanced window, disable EAP and enable MPPE. Then click OK.

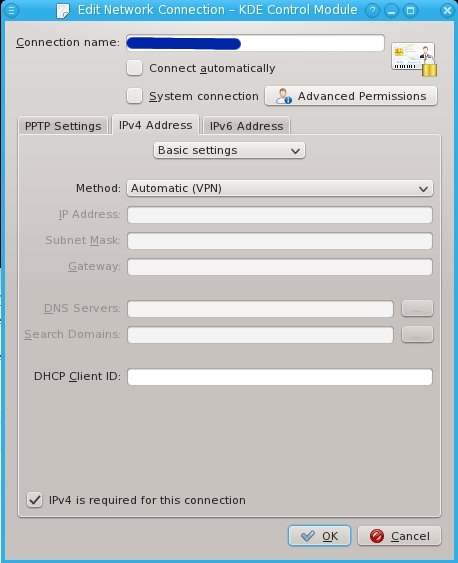
Go to the tab IPv4. Under method, I chose Automatic (VPN). But Automatic (VPN) addresses only is also a nice option: it sets the IPs but no DNS settings.

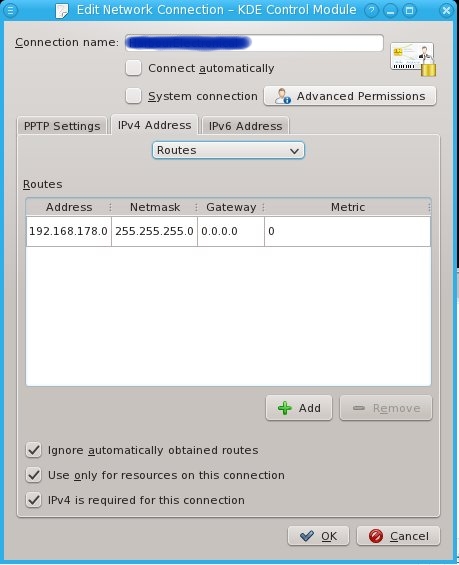
Go to the routes sub-tab. Switch on Ignore automatically obtained routes and Use only for resources on this connection to make sure the connection doesn't steal your traffic. Then I entered a manual route: 192.168.178.0/255.255.255.0 to gateway 0.0.0.0 (it is a ppp device after all).

You may want to configure IPv6 as well, but I don't at this moment, so I'm not documenting this.

Step 3: Connect

Click on the icon in the tray and connect.

Ubuntu/Debian

I'm running RedHat-based software on all of my machines. Above information may be useful for Ubuntu/Debian users, but it's not tested and I'm not supporting it.

Servers: RedHat Enterprise Linux/CentOS is more suitable for servers, as there's a lot of professional level support available. I think that's important, because if I say, get a car accident, I want the servers to be managable by another professional.

Desktops/Laptops: RPM packages are pretty exchangable between RedHat-based platforms. That's a good reason to run Fedora on the desktop.
© GeekLabInfo Setting up a PPTP VPN to a Windows 2008 Server is a post from GeekLab.info. You are free to copy materials from GeekLab.info, but you are required to link back to http://www.geeklab.info

1 Star2 Stars3 Stars4 Stars5 Stars (1 votes, average: 5.00 out of 5)
Loading...

Squid with active directory authentication on Centos 6.0

In this post, I'll be writing down all steps required to build a Squid proxy server on a clean "minimal" installation of CentOS 6.0

Step 1. Network configuration

First, install system-config-network or manually configure the network. I prefer system-config-network for easy configurations and vim for more complex configurations.
yum -y install system-config-network-tui

Step 2. Install some tools for convenience

yum -y install vim-minimal vim-enhanced openssh-clients mc telnet policycoreutils policycoreutils-python bind-utils

Step 3. Install ntp and synchronize clocks

If one of the clocks it out of sync, NTLM authentication will not work. Therefore, we synchronize the clocks. Using pool.ntp.org as a source would be good, but if the AD server isn't synchronized with that source, we'd have the same problem. So I'm synchonizing the proxy to the AD server (Win2003SBS actually) instead:
rpm -q ntp || yum -y install ntp
sed -i "s/^server /#server /g" /etc/ntp.conf
echo "server AD-SERVERNAME" >> /etc/ntp.conf
ntpdate AD-SERVERNAME #synchronize right now
service ntpd start #and keep in sync
chkconfig ntpd on

Step 4. Install squid and other required software

yum -y install krb5-workstation samba-common samba-winbind authconfig squid
chkconfig squid on

Step 5. Connect to active directory

Please note that MYCOMPANY.local and mycompany.local may be different domains due to the upper/lowercase.
ADSERVER=sbs.MYCOMPANY.local
DOMAIN=MYCOMPANY.local
WORKGROUP=MYCOMPANY
authconfig --enableshadow --enablemd5 --passalgo=md5 --krb5kdc=$ADSERVER \
--krb5realm=$DOMAIN --smbservers=$ADSERVER --smbworkgroup=$WORKGROUP \
--enablewinbind --enablewinbindauth --smbsecurity=ads --smbrealm=$DOMAIN \
--smbidmapuid="16777216-33554431" --smbidmapgid="16777216-33554431" --winbindseparator="+" \
--winbindtemplateshell="/bin/false" --enablewinbindusedefaultdomain --disablewinbindoffline \
--winbindjoin=Administrator --disablewins --disablecache --enablelocauthorize --updateall
service winbind restart
chkconfig winbind on

Give squid permissions to use winbind info:
usermod -G wbpriv squid

Now check your winbind connection using the following commands:
wbinfo -u
wbinfo -g

Step 6. Firewall

iptables -I INPUT -m tcp -p tcp --dport 3128 -j ACCEPT
/sbin/service iptables save

Step 7. Configure squid

I commented out this line from /etc/squid/squid.conf:
http_access allow localnet
That line would have allowed users from 10.0.0.0/8+172.16.0.0/12+192.168.0.0/16 and others to use the proxy without authentication. Then I added the following right below that line:
acl whitelist dstdom_regex -i "/etc/squid/whitelist"
http_access allow whitelist
auth_param ntlm program /usr/bin/ntlm_auth --helper-protocol=squid-2.5-ntlmssp
auth_param ntlm children 5
auth_param ntlm keep_alive on
acl our_networks src 192.168.0.0/16
acl ntlm proxy_auth REQUIRED
http_access allow our_networks ntlm
authenticate_ip_ttl 900 seconds

This will allow all valid, logged in users to surf the web. You could also limit which users can surf by adding --require-membership-of=ADGROUPNAME to the ntlm_auth command

The first two lines of above configuration point to a file /etc/squid/whitelist. This file contains domains that should never be denied. My whitelist file contains:
\.trendmicro\.com
^trendmicro\.com
\.microsoft\.com
^microsoft\.com

This means that anything at *.microsoft.com and microsoft.com (without subdomain) as well as *.trendmicro.com as trendmicro.com (my virusscanner) is always allowed for any user. We wouldn't want to block important updates.

Start Squid using /sbin/service squid restart and the proxy is ready.

Step 8. Optional: IPv6 issues

I've been experimenting with IPv6 for a while now, but I don't have IPv6 available on all systems. That caused me some trouble with the next step. I had to give preference to IPv4 above IPv6 by editting /etc/gai.conf:
label ::1/128 0
label ::/0 1
label 2002::/16 2
label ::/96 3
label ::ffff:0:0/96 4
label fec0::/10 5
label fc00::/7 6
precedence ::ffff:0:0/96 100
precedence ::1/128 50
precedence ::/0 40
precedence 2002::/16 30
precedence ::/96 20

Step 9. Optional: Some white- and blacklisting

We may not want to allow all sites to be visited. For instance, porn sites are often blocked in office situations. I've got a manual on blacklisting using SquidGuard as well.

© GeekLabInfo Squid with active directory authentication on Centos 6.0 is a post from GeekLab.info. You are free to copy materials from GeekLab.info, but you are required to link back to http://www.geeklab.info

1 Star2 Stars3 Stars4 Stars5 Stars (2 votes, average: 5.00 out of 5)
Loading...