WiFi on a HP Elitebook 8570w

There once was a day that I compiled my own kernels and configured all modules manually. It's been quite a while since I've done anything like that, but I remembered some of it.

Today I installed my WiFi drivers. The HP Elitebook 8570w I own has a Centrino Advanced-N 6205 on board that is actually supported by Fedora 17.

$ lspci
00:00.0 Host bridge: Intel Corporation Ivy Bridge DRAM Controller (rev 09)
00:01.0 PCI bridge: Intel Corporation Ivy Bridge PCI Express Root Port (rev 09)
00:14.0 USB Controller: Intel Corporation Panther Point USB xHCI Host Controller (rev 04)
00:16.0 Communication controller: Intel Corporation Panther Point MEI Controller #1 (rev 04)
00:19.0 Ethernet controller: Intel Corporation 82579LM Gigabit Network Connection (rev 04)
00:1a.0 USB Controller: Intel Corporation Panther Point USB Enhanced Host Controller #2 (rev 04)
00:1b.0 Audio device: Intel Corporation Panther Point High Definition Audio Controller (rev 04)
00:1c.0 PCI bridge: Intel Corporation Panther Point PCI Express Root Port 1 (rev c4)
00:1c.1 PCI bridge: Intel Corporation Panther Point PCI Express Root Port 2 (rev c4)
00:1c.2 PCI bridge: Intel Corporation Panther Point PCI Express Root Port 3 (rev c4)
00:1c.3 PCI bridge: Intel Corporation Panther Point PCI Express Root Port 4 (rev c4)
00:1d.0 USB Controller: Intel Corporation Panther Point USB Enhanced Host Controller #1 (rev 04)
00:1f.0 ISA bridge: Intel Corporation Panther Point LPC Controller (rev 04)
00:1f.2 SATA controller: Intel Corporation Panther Point 6 port SATA AHCI Controller (rev 04)
00:1f.3 SMBus: Intel Corporation Panther Point SMBus Controller (rev 04)
01:00.0 VGA compatible controller: nVidia Corporation Device 0ffc (rev a1)
01:00.1 Audio device: nVidia Corporation Device 0e1b (rev a1)
24:00.0 FireWire (IEEE 1394): JMicron Technology Corp. IEEE 1394 Host Controller (rev 30)
24:00.1 System peripheral: JMicron Technology Corp. SD/MMC Host Controller (rev 30)
24:00.2 SD Host controller: JMicron Technology Corp. Standard SD Host Controller (rev 30)
25:00.0 Network controller: Intel Corporation Centrino Advanced-N 6205 (rev 34)

The device at the very bottom is the WiFi device we're looking for. But iwconfig shows it's not available to the system somehow:

$ iwconfig
thuisf    no wireless extensions.
 
vmnet8    no wireless extensions.
 
thuis     no wireless extensions.
 
eth0      no wireless extensions.
 
lo        no wireless extensions.
 
virbr0-nic  no wireless extensions.
 
virbr0    no wireless extensions.
 
noc       no wireless extensions.
 
vmnet1    no wireless extensions.

Continue Reading…

© GeekLabInfo WiFi on a HP Elitebook 8570w is a post from GeekLab.info. You are free to copy materials from GeekLab.info, but you are required to link back to http://www.geeklab.info

1 Star2 Stars3 Stars4 Stars5 Stars (No Ratings Yet)
Loading...

Backup your phone with zero keypresses

I created some scripts to backup my Samsung Galaxy S2 to my Fedora 16 system without pressing any keys or even touching the mouse. It works like this:

To backup a SGS2, you go to settings > applications > usb tools on the phone, and click the button. You then connect it to a usb cable. At that moment, two removable devices become visible to the Linux system: one for the SD card, one for the built-in memory. But they still contain no media. Only when you press another button on the phone, the "media are inserted in the devices", triggering a "change" action with the udev daemon.

Configuration of the udev daemon

Create a file /etc/udev/rules.d/71-android-backup.rules:

SUBSYSTEM=="block", ACTION=="change", ENV{ID_SERIAL}=="Android_UMS_Composite_XXXXXXXXXXXXXXXX-0:0", ENV{DISK_MEDIA_CHANGE}=="1", ENV{ID_FS_TYPE}=="vfat", RUN+="/usr/local/bin/androidbackup"

Whenever a (virtual) medium is inserted, a udev change action is triggered. Actually, it gets triggered multiple times, but we only need the one that has the environment variable DISK_MEDIA_CHANGE=1 set.

Action to perform

The action triggered is /usr/local/bin/androidbackup and all parameters are in the environment. So let's create that file. I use a rsnapshot-like operation to backup my data, but without actually using rsnapshot.

#!/bin/bash
 
function msg {
        /usr/bin/logger -t android "$1"
        DISPLAY=:0 qdbus $dbusRef setLabelText "$1"
        DISPLAY=:0 qdbus $dbusRef Set "" value $2
}
 
if [ "$1" != "FORKED" ]; then
        $0 FORKED &
        exit 0
fi
 
if [ -f /etc/sysconfig/androidbackup ]; then
        . /etc/sysconfig/androidbackup
else
        echo /etc/sysconfig/androidbackup does not exist
        exit 0
fi
 
#debug disabled:
#set > /tmp/android/`date +%s`.$RANDOM
 
dbusRef=`kdialog --display :0 --progressbar "Backup android..." 100`
 
msg "Attach $DEVNAME $ACTION $ID_SERIAL" 0
 
if [ ! -e $DESTINATION ]; then
        # I could mkdir -p, but sometimes $DESTINATION could just be a network location that's offline
        msg "Android will not be backed up: $DESTINATION is not okay" 0
        exit 0
fi
 
mkdir -p /mnt/android
 
mount $DEVNAME /mnt/android 
rc=$?
if [ $rc -ne 0 ]; then
        msg "Problem mounting $DEVNAME to /mnt/android: $rc " 0
        mount | grep android 2>&1 | logger -t androidbackup
        exit 0
fi
 
if [ "`mount |grep -i /mnt/android`" == "" ]; then
        msg "Cannot find /mnt/android in mount table" 0
        exit 0
fi
 
msg "Remove old backup" 8
[ -e $DESTINATION/backup.30 ] && rm -rf $DESTINATION/backup.30
 
msg "Start backup" 10
for i in `/usr/bin/seq 30 -1 2`; do 
        if [ -e $DESTINATION/backup.$((i-1)) ]; then
                msg "mv $DESTINATION/backup.$((i-1)) $DESTINATION/backup.$i" 11
                mv $DESTINATION/backup.$((i-1)) $DESTINATION/backup.$i
        fi
done
 
msg "Copy" 40
[ -e $DESTINATION/backup.0 ] && /bin/cp -al $DESTINATION/backup.0 $DESTINATION/backup.1
mkdir -p $DESTINATION/backup.0/
 
msg "Start rsync" 40
/usr/bin/rsync -az --numeric-ids --delete --hard-links /mnt/android/ $DESTINATION/backup.0/
touch $DESTINATION/backup.0/
 
chown -R $CHOWN $DESTINATION/backup.0
 
umount /mnt/android
 
msg "Done" 100
exit 0

Since that file refers to /etc/sysconfig/androidbackup, let's also make that file:

#next line defines the location of all backups
DESTINATION=/home/geeklab/.androidbackup
 
#next line defines the owner of all files copied
CHOWN=geeklab
© GeekLabInfo Backup your phone with zero keypresses is a post from GeekLab.info. You are free to copy materials from GeekLab.info, but you are required to link back to http://www.geeklab.info

1 Star2 Stars3 Stars4 Stars5 Stars (No Ratings Yet)
Loading...

Setting up a PPTP VPN to a Windows 2008 Server

Requirements

Linux
KDE
A Windows server to connect to.

Step 1: Install required software

yum install kde-plasma-networkmanagement-pptp NetworkManager-pptp

Step 2: Configure the network

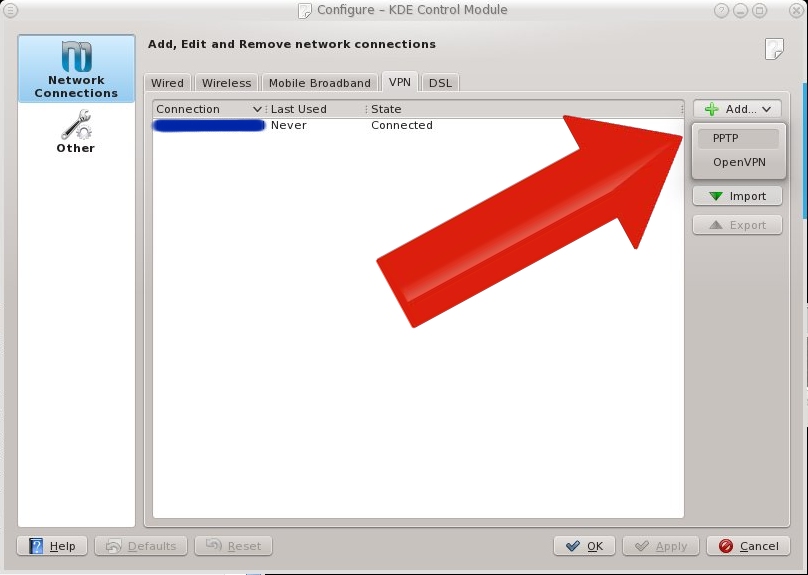
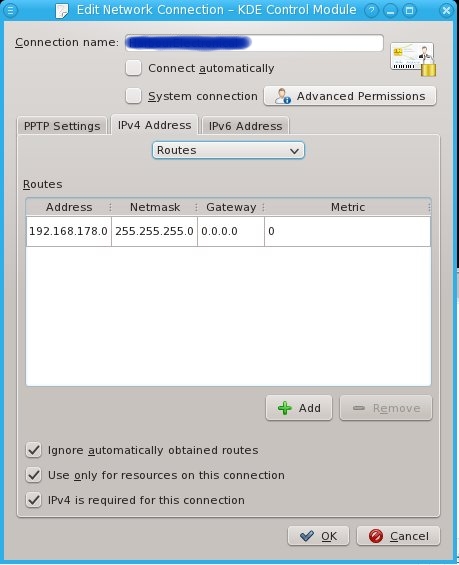
In the KDE Network Manager plasma module, go to the tab VPN, click add and choose PPTP.

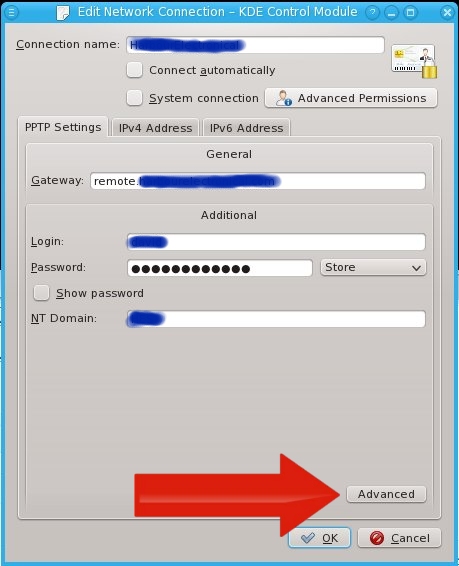
Enter and connection name you like. In the field "gateway" type the hostname or IP number of the Windows server you're connecting to. Under Login, Password and NT Domain, fill in your authentication data. Then click advanced.

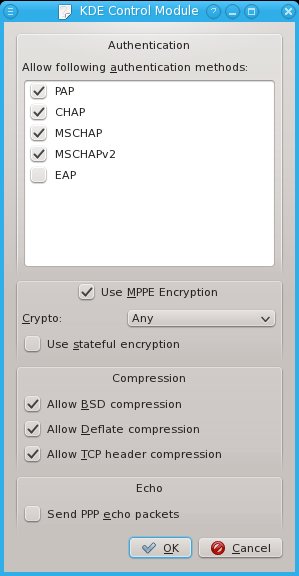
In the advanced window, disable EAP and enable MPPE. Then click OK.

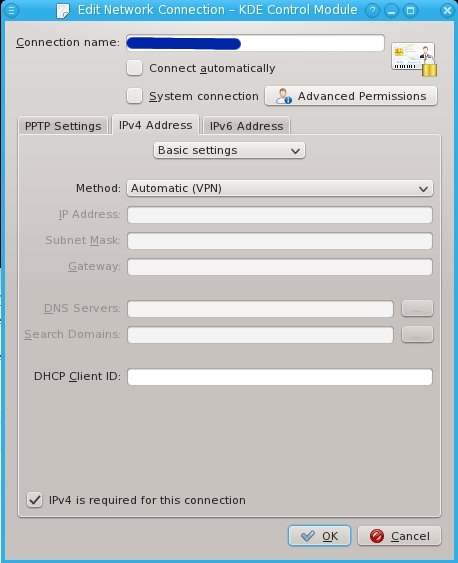
Go to the tab IPv4. Under method, I chose Automatic (VPN). But Automatic (VPN) addresses only is also a nice option: it sets the IPs but no DNS settings.

Go to the routes sub-tab. Switch on Ignore automatically obtained routes and Use only for resources on this connection to make sure the connection doesn't steal your traffic. Then I entered a manual route: 192.168.178.0/255.255.255.0 to gateway 0.0.0.0 (it is a ppp device after all).

You may want to configure IPv6 as well, but I don't at this moment, so I'm not documenting this.

Step 3: Connect

Click on the icon in the tray and connect.

Ubuntu/Debian

I'm running RedHat-based software on all of my machines. Above information may be useful for Ubuntu/Debian users, but it's not tested and I'm not supporting it.

Servers: RedHat Enterprise Linux/CentOS is more suitable for servers, as there's a lot of professional level support available. I think that's important, because if I say, get a car accident, I want the servers to be managable by another professional.

Desktops/Laptops: RPM packages are pretty exchangable between RedHat-based platforms. That's a good reason to run Fedora on the desktop.
© GeekLabInfo Setting up a PPTP VPN to a Windows 2008 Server is a post from GeekLab.info. You are free to copy materials from GeekLab.info, but you are required to link back to http://www.geeklab.info

1 Star2 Stars3 Stars4 Stars5 Stars (1 votes, average: 5.00 out of 5)
Loading...

Squid with active directory authentication on Centos 6.0

In this post, I'll be writing down all steps required to build a Squid proxy server on a clean "minimal" installation of CentOS 6.0

Step 1. Network configuration

First, install system-config-network or manually configure the network. I prefer system-config-network for easy configurations and vim for more complex configurations.
yum -y install system-config-network-tui

Step 2. Install some tools for convenience

yum -y install vim-minimal vim-enhanced openssh-clients mc telnet policycoreutils policycoreutils-python bind-utils

Step 3. Install ntp and synchronize clocks

If one of the clocks it out of sync, NTLM authentication will not work. Therefore, we synchronize the clocks. Using pool.ntp.org as a source would be good, but if the AD server isn't synchronized with that source, we'd have the same problem. So I'm synchonizing the proxy to the AD server (Win2003SBS actually) instead:
rpm -q ntp || yum -y install ntp
sed -i "s/^server /#server /g" /etc/ntp.conf
echo "server AD-SERVERNAME" >> /etc/ntp.conf
ntpdate AD-SERVERNAME #synchronize right now
service ntpd start #and keep in sync
chkconfig ntpd on

Step 4. Install squid and other required software

yum -y install krb5-workstation samba-common samba-winbind authconfig squid
chkconfig squid on

Step 5. Connect to active directory

Please note that MYCOMPANY.local and mycompany.local may be different domains due to the upper/lowercase.
ADSERVER=sbs.MYCOMPANY.local
DOMAIN=MYCOMPANY.local
WORKGROUP=MYCOMPANY
authconfig --enableshadow --enablemd5 --passalgo=md5 --krb5kdc=$ADSERVER \
--krb5realm=$DOMAIN --smbservers=$ADSERVER --smbworkgroup=$WORKGROUP \
--enablewinbind --enablewinbindauth --smbsecurity=ads --smbrealm=$DOMAIN \
--smbidmapuid="16777216-33554431" --smbidmapgid="16777216-33554431" --winbindseparator="+" \
--winbindtemplateshell="/bin/false" --enablewinbindusedefaultdomain --disablewinbindoffline \
--winbindjoin=Administrator --disablewins --disablecache --enablelocauthorize --updateall
service winbind restart
chkconfig winbind on

Give squid permissions to use winbind info:
usermod -G wbpriv squid

Now check your winbind connection using the following commands:
wbinfo -u
wbinfo -g

Step 6. Firewall

iptables -I INPUT -m tcp -p tcp --dport 3128 -j ACCEPT
/sbin/service iptables save

Step 7. Configure squid

I commented out this line from /etc/squid/squid.conf:
http_access allow localnet
That line would have allowed users from 10.0.0.0/8+172.16.0.0/12+192.168.0.0/16 and others to use the proxy without authentication. Then I added the following right below that line:
acl whitelist dstdom_regex -i "/etc/squid/whitelist"
http_access allow whitelist
auth_param ntlm program /usr/bin/ntlm_auth --helper-protocol=squid-2.5-ntlmssp
auth_param ntlm children 5
auth_param ntlm keep_alive on
acl our_networks src 192.168.0.0/16
acl ntlm proxy_auth REQUIRED
http_access allow our_networks ntlm
authenticate_ip_ttl 900 seconds

This will allow all valid, logged in users to surf the web. You could also limit which users can surf by adding --require-membership-of=ADGROUPNAME to the ntlm_auth command

The first two lines of above configuration point to a file /etc/squid/whitelist. This file contains domains that should never be denied. My whitelist file contains:
\.trendmicro\.com
^trendmicro\.com
\.microsoft\.com
^microsoft\.com

This means that anything at *.microsoft.com and microsoft.com (without subdomain) as well as *.trendmicro.com as trendmicro.com (my virusscanner) is always allowed for any user. We wouldn't want to block important updates.

Start Squid using /sbin/service squid restart and the proxy is ready.

Step 8. Optional: IPv6 issues

I've been experimenting with IPv6 for a while now, but I don't have IPv6 available on all systems. That caused me some trouble with the next step. I had to give preference to IPv4 above IPv6 by editting /etc/gai.conf:
label ::1/128 0
label ::/0 1
label 2002::/16 2
label ::/96 3
label ::ffff:0:0/96 4
label fec0::/10 5
label fc00::/7 6
precedence ::ffff:0:0/96 100
precedence ::1/128 50
precedence ::/0 40
precedence 2002::/16 30
precedence ::/96 20

Step 9. Optional: Some white- and blacklisting

We may not want to allow all sites to be visited. For instance, porn sites are often blocked in office situations. I've got a manual on blacklisting using SquidGuard as well.

© GeekLabInfo Squid with active directory authentication on Centos 6.0 is a post from GeekLab.info. You are free to copy materials from GeekLab.info, but you are required to link back to http://www.geeklab.info

1 Star2 Stars3 Stars4 Stars5 Stars (2 votes, average: 5.00 out of 5)
Loading...

Playing with the sockets: socat and netcat

Connect two netcats to each other

mkfifo backpipe
nc localhost 55545 0backpipe

Telnet with readline and a history:

socat -d -d READLINE,history=$HOME/.http_history \
TCP4:www.domain.org:www,crnl

Talk to your modem in raw mode:

socat - /dev/ttyS0,raw,echo=0,crnl

Simulate tail -f:

socat -u /var/log/messages,seek-end=0,ignoreeof -

Give a random interactive program, such as nslookup, a history:

socat readline,history=.nslookup_hist exec:"nslookup",pty,ctty,setsid,echo=0

Use your modem with a non-persistent history:

socat readline /dev/ttyS0,raw,echo=0,crlf,nonblock

Use your modem with a persistent history:

socat READLINE,history:/tmp/serial.cmds \
  OPEN:/dev/ttyS0,ispeed=9600,ospeed=9600,crnl,raw,sane,echo=false

To dos (as in tofrodos):

socat -u - -,crlf

From dos (as in tofrodos):

socat -u -,cr -

Run sendmail daemon with your favorite network options

Warning: using this wrong may result in becoming an open relay!

socat TCP-LISTEN:25,fork,ip-ttl=4,ip-tos=7,tcp-maxseg=576 EXEC:"/usr/sbin/sendmail -bs",nofork

Send a mail using chat (from ppp package):

socat -d -d system:'/usr/sbin/chat "220 " "HELO loopback" "250 " "MAIL FROM: <root@localhost>" "250 " "RCPT TO: root" "250 " "DATA" "354 " "test'$(echo -e "\r.")'" "250 " "QUIT"',pty,echo=0,cr tcp:localhost:25,crlf,nodelay

Connect remote X :1 to local X :0

socat exec:'ssh root@troas socat unix-l\:/tmp/.X11-unix/X1 -' unix:/tmp/.X11-unix/X0

Note the escaping of the colon in the remote command.

Sending a file - Server sending the file

server$ socat -u FILE:test.dat TCP-LISTEN:9876,reuseaddr
client$ socat -u TCP:127.0.0.1:9876 OPEN:out.dat,creat

Sending a file - Server receiving the file

server$ socat -u TCP-LISTEN:9876,reuseaddr OPEN:out.txt,creat
client$ socat -u FILE:test.txt TCP:127.0.0.1:9876

Be a syslog server:

socat -u UDP4-LISTEN:5140,reuseaddr,fork OPEN:/tmp/syslog.msg,creat,append

I can't figure out how to put a newline after each message...

Send syslog messages to screen:

socat -t0 -T0 -u UDP4-LISTEN:514,reuseaddr,fork -

To get time from time server:

socat TCP:time.nist.gov:13 -

Really sick - use socat as a VPN solution:

socat -d -d  \
    TUN:192.168.99.2/24,up \
    SYSTEM:"ssh root@remote-server socat -d -d  - 'TUN:192.168.99.1/24,up'"

This must be run as a user that can modify tap/tun devices on both sides of the tunnel.

Use a remote modem

On the side with the modem

socat /dev/ttyS0,raw,echo=0 tcp4-listen:3334

On the side where you want the modem transferred

socat PTY,link=$HOME/vmodem0,raw,echo=0 TCP:servername:3334

You can now access remote /dev/ttyS0 through local $HOME/vmodem0

Use a remote modem over SSH

socat PTY,link=$HOME/vmodem0,waitslave \
 EXEC:"ssh root@remote-server socat - /dev/ttyS0"

You can now access remote /dev/ttyS0 through local $HOME/vmodem0. Remove waitslave to keep alive after local client disconnect.

Using OpenSSL over UDP

This uses a chaining method I believe to be only available in socat2.
On the listening side:

socat2 - "OPENSSL-SERVER,cert=client.pem,cafile=server.crt|UDP4-LISTEN:4430,fork"

On the connecting side:

socat2 exec:ls "OPENSSL-CLIENT,cert=server.pem,cafile=client.crt|UDP4:localhost:4430"

OpenSSL Tunnel

First, generate certificates and distribute them to either side:

FILENAME=server
openssl genrsa -out $FILENAME.key 1024 
openssl req -new -key $FILENAME.key -x509 -days 3653 -out $FILENAME.crt 
cat $FILENAME.key $FILENAME.crt >$FILENAME.pem 
chmod 600 $FILENAME.key $FILENAME.pem 
 
FILENAME=client
openssl genrsa -out $FILENAME.key 1024 
openssl req -new -key $FILENAME.key -x509 -days 3653 -out $FILENAME.crt 
cat $FILENAME.key $FILENAME.crt >$FILENAME.pem 
chmod 600 $FILENAME.key $FILENAME.pem

On the listening side:

socat openssl-listen:4433,reuseaddr,cert=server.pem,cafile=client.crt tcp-connect:localhost

On the connecting side:

socat - openssl-connect:server.domain.org:4433,cert=client.pem,cafile=server.crt

More information:
1 2

© GeekLabInfo Playing with the sockets: socat and netcat is a post from GeekLab.info. You are free to copy materials from GeekLab.info, but you are required to link back to http://www.geeklab.info

1 Star2 Stars3 Stars4 Stars5 Stars (3 votes, average: 5.00 out of 5)
Loading...

CUPS ERROR: Unable to write raster data to driver!

On my CUPS server, I've connected a Dymo 400 labelwriter. For some reason, while printing labels perfectly, I just can't get the imagetoraster filter to stop "crashing" with the following error:
ERROR: Unable to write raster data to driver!

So I fixed this the dirty way. I downloaded the CUPS Source RPM from CentOS. I installed it to /usr/src/redhat using the command rpm -i cups-1.4.2-35.el6.src.rpm. In the directory SOURCES, I added a file named geeklab.patch containing:

--- cups-1.4.2/filter/imagetoraster.c   2009-06-05 23:38:52.000000000 +0200
+++ cups-1.4.2/filter/imagetoraster.cpatched    2011-10-21 11:18:28.427271405 +0200
@@ -1197,7 +1197,7 @@
                fputs(_("ERROR: Unable to write raster data to driver!\n"),
                      stderr);
                cupsImageClose(img);
-               exit(1);
+               exit(0);
              }
             }
          }
@@ -1293,7 +1293,7 @@
               fputs(_("ERROR: Unable to write raster data to driver!\n"),
                    stderr);
              cupsImageClose(img);
-             exit(1);
+             exit(0);
            }
 
            /*
@@ -1333,7 +1333,7 @@
                fputs(_("ERROR: Unable to write raster data to driver!\n"),
                      stderr);
                cupsImageClose(img);
-               exit(1);
+               exit(0);
              }
             }
          }

Then I added to the spec:
Patch700: geeklab.patch
after the line that starts with Patch100:
and %patch700 -p1 -b .geeklab just after the line that starts with %patch100

Now you can use the regular rpmbuild commands to build packages:
rpmbuild -bs <specname> to build a new SRPM
rpmbuild -ba <specname> to build a new SRPM and binary RPMs
I personally prefer the first, as I mostly use mock to build clean destination RPMs.

© GeekLabInfo CUPS ERROR: Unable to write raster data to driver! is a post from GeekLab.info. You are free to copy materials from GeekLab.info, but you are required to link back to http://www.geeklab.info

1 Star2 Stars3 Stars4 Stars5 Stars (No Ratings Yet)
Loading...

Unable to connect to CUPS server localhost:631 – Connection refused

On my fileserver, I have printing disabled in Samba but still I get all these messages in the logs:
[2011/12/08 10:18:26.821280, 0] printing/print_cups.c:108(cups_connect)
Unable to connect to CUPS server localhost:631 - Connection refused

I don't want Samba to offer printers. After trying some configurations, I found this made smbd stop trying:

load printers = no
printing = bsd
printcap name = /dev/null
© GeekLabInfo Unable to connect to CUPS server localhost:631 - Connection refused is a post from GeekLab.info. You are free to copy materials from GeekLab.info, but you are required to link back to http://www.geeklab.info

1 Star2 Stars3 Stars4 Stars5 Stars (3 votes, average: 5.00 out of 5)
Loading...