Install mod_auth_ntlm_winbind on CentOS 6.0

Step 1. Install ntp and synchronize clocks

We'll be using winbind, kerberos and ntlm to authenticate the user. This requires the clocks of the AD server and the proxy server to be synchronized.

yum -y install ntp
sed -i "s/^server /#server /g" /etc/ntp.conf
echo "server YOURSERVERNAME" >> /etc/ntp.conf
ntpdate YOURSERVERNAME #synchronize right now
service ntpd start #and keep in sync
chkconfig ntpd on #after reboot as well

Step 2. Update system and install required software

yum update
yum install mc vim httpd php svn httpd-devel make autoconf gcc ntp krb5-workstation \
samba-common authconfig samba-winbind

Step 3. Connect to active directory

Please note that MYCOMPANY.local and mycompany.local may be different domains due to the upper/lowercase.
ADSERVER=sbs.MYCOMPANY.local
DOMAIN=MYCOMPANY.local
WORKGROUP=MYCOMPANY
authconfig --enableshadow --enablemd5 --passalgo=md5 --krb5kdc=$ADSERVER \
--krb5realm=$DOMAIN --smbservers=$ADSERVER --smbworkgroup=$WORKGROUP \
--enablewinbind --enablewinbindauth --smbsecurity=ads --smbrealm=$DOMAIN \
--smbidmapuid="16777216-33554431" --smbidmapgid="16777216-33554431" --winbindseparator="+" \
--winbindtemplateshell="/bin/false" --enablewinbindusedefaultdomain --disablewinbindoffline \
--winbindjoin=Administrator --disablewins --disablecache --enablelocauthorize --updateall
service winbind start ; chkconfig winbind on
setsebool -P allow_httpd_mod_auth_ntlm_winbind on

Now check your winbind connection using the following commands:
wbinfo -u
wbinfo -g

The socket /var/lib/samba/winbindd_privileged/pipe should be writable by the webserver. To allow that access, I add user apache to the group wbpriv: usermod -G wbpriv apache

Step 4. Download and compile mod_auth_ntlm_winbind

svn co svn://svnanon.samba.org/lorikeet/trunk/mod_auth_ntlm_winbind mod_auth_ntlm_winbind
cd mod_auth_ntlm_winbind/
autoconf
./configure
apxs -DAPACHE2 -c -i mod_auth_ntlm_winbind.c

Step 5. Configure it

In /etc/httpd/conf.d/mod_auth_ntlm_winbind.conf I put the following configuration
LoadModule auth_ntlm_winbind_module /usr/lib64/httpd/modules/mod_auth_ntlm_winbind.so

Options ExecCGI
AllowOverride None
Order allow,deny
Allow from all
AuthName "NTLM Authentication"
AuthType NTLM
Require valid-user
NTLMAuth on
NTLMAuthHelper "/usr/bin/ntlm_auth --helper-protocol=squid-2.5-ntlmssp"
NTLMBasicAuthoritative on

In /etc/httpd/conf/httpd.conf, change KeepAlive Off to KeepAlive On. Preferably, also set MaxKeepAliveRequests and KeepAliveTimeout to a high value. On my intranet server, they're set to 1000 requests and 600 seconds.:w

Step 6. Change your firewall to enable incoming HTTP

iptables -I INPUT -p tcp --dport 80 -j ACCEPT
service iptables save

Step 7. Go!

Run service httpd restart, make httpd start on reboot using chkconfig httpd on and test your configuration.

© GeekLabInfo Install mod_auth_ntlm_winbind on CentOS 6.0 is a post from GeekLab.info. You are free to copy materials from GeekLab.info, but you are required to link back to http://www.geeklab.info
1 Star2 Stars3 Stars4 Stars5 Stars (1 votes, average: 5.00 out of 5)
Loading...

How to use chained SSL certificates

What are chained SSL certificates?

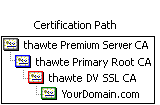
Normal "single root" certs are only certified by one single parent which is recognised by clients immediately. Chained certs on the other side are signed by a parent which itself is signed by another parent. This effectively makes your cert a "grandchild" of the CA root. In the image attached you'll see a cert that is chained by two intermediate certs.

How to use chained SSL certificates?

The several server software distributions require different types of configuration. This page is not telling you how to set up ssl for your software, I'm just telling how to use chained certs with the different programs.

Apache

Apache has quite some SSL functionality on board. I'm not gonna discuss it all, just want to say that the words you're looking for are:

SSLCertificateFile [path to crt file here]
SSLCertificateKeyFile [path to key file here]
SSLCACertificateFile [path to intermediate ca certs bundle here]

I downloaded the intermediate CA certs from my SSL provider: https://search.thawte.com/support/ssl-digital-certificates/index?page=content&id=AR1371 . Your SSL provider has a page with their own intermediate CA certs.

PureFTPd

My PureFTPd key and cert are all located in /etc/pure-ftpd/pure-ftpd.pem. In order to make ftp clients accept the SSL cert, i performed the following steps:

  1. I downloaded the intermediate CA certs from my SSL provider: https://search.thawte.com/support/ssl-digital-certificates/index?page=content&id=AR1371 . Your SSL provider has a page with their own intermediate CA certs.
  2. I combined the contents of the key, my own cert and the intermediate CA certs to /etc/postfix/ssl/smtpd.pem. I don't know if the order of the certs is important, but just to be sure I went back one parent at a time. So my file contains from top to bottom: my private key, certificate for my domain, thawte DV SSL CA, thawte primary root. It doesn't need thawte primary server CA as your client already has this one.
  3. Test it: openssl s_client -connect [your-hostname]:21 -starttls ftp

Dovecot

My dovecot SSL key is located in /etc/pki/dovecot/private/dovecot.pem and my SSL cert is /etc/pki/dovecot/certs/dovecot.pem. In order to make email clients accept the SSL cert, i performed the following steps:

  1. I downloaded the intermediate CA certs from my SSL provider: https://search.thawte.com/support/ssl-digital-certificates/index?page=content&id=AR1371 . Your SSL provider has a page with their own intermediate CA certs.
  2. I added the contents of the intermediate CA certs to /etc/pki/dovecot/certs/dovecot.pem. I don't know if the order of the certs is important, but just to be sure I went back one parent at a time. So my file contains from top to bottom: YourDomain.com, thawte DV SSL CA, thawte primary root. It doesn't need thawte primary server CA as your client already has this one.
  3. Test pop3s: openssl s_client -connect popserver:995
  4. Test imaps: openssl s_client -connect imapserver:995

Postfix

My postfix key and cert are all located in /etc/postfix/ssl/smtpd.pem.
In order to make email clients accept the SSL cert, i performed the following steps:

  1. I downloaded the intermediate CA certs from my SSL provider: https://search.thawte.com/support/ssl-digital-certificates/index?page=content&id=AR1371 . Your SSL provider has a page with their own intermediate CA certs.
  2. I combined the contents of the key, my own cert and the intermediate CA certs to /etc/postfix/ssl/smtpd.pem. I don't know if the order of the certs is important, but just to be sure I went back one parent at a time. So my file contains from top to bottom: my private key, certificate for my domain, thawte DV SSL CA, thawte primary root. It doesn't need thawte primary server CA as your client already has this one.
  3. Test smtps: openssl s_client -connect [your-hostname]:465
  4. Test smtp with starttls: openssl s_client -connect [your-hostname]:25 -starttls smtp
© GeekLabInfo How to use chained SSL certificates is a post from GeekLab.info. You are free to copy materials from GeekLab.info, but you are required to link back to http://www.geeklab.info

1 Star2 Stars3 Stars4 Stars5 Stars (8 votes, average: 3.88 out of 5)
Loading...

Speed up your website: Preloading and caching images

For a customer, I'm building a website that has a pretty large header jpeg that is different for every single page. To speed up loading several pages, I've taken several steps:

1. Force browser caching

You can tell a browser to keep certain files in cache longer than normal. In apache, update the virtual host configuration or put this in a .htaccess file:
<FilesMatch "\.(jpg|jpeg|png|gif|swf|css|ico|js)$">
ExpiresActive On
ExpiresDefault A864000
</FilesMatch>

2. Install libraries

2a jQuery
On this site, I'm using jQuery to perform some tasks. As it was loaded anyway, I can use it for this task as well. So, download jQuery here and install it like:
<script type='text/javascript' src='/lib/jquery.js'></script>

2b jQuery cookie
Download the jQuery cookie plugin (by Klaus Hartl) as well
<script type='text/javascript' src='/lib/jquery.cookie.js'></script>

2c jQuery cookie
The last lib is a image preloading plugin for jQuery, that I found on engineeredweb.com:
(function($) {
var cache = [];
// Arguments are image paths relative to the current page.
$.preLoadImages = function() {
var args_len = arguments.length;
for (var i = args_len; i--;) {
var cacheImage = document.createElement('img');
cacheImage.src = arguments[i];
cache.push(cacheImage);
}
}
})(jQuery)

You can put it in a separate file, for example jquery.preload.js. And again, load it: <script type='text/javascript' src='/lib/jquery.preload.js'></script>

3. Put it all together

jQuery(document).ready(function(){
if(jQuery.cookie("preload")==null){
try{
jQuery.preLoadImages("header1.jpg","header2.jpg");
}catch(e){}
jQuery.cookie("preload",1,{path:"/"})
}
});'

This means:
jQuery(document).ready( = wait until document is completely loaded before starting new downloads.
if(jQuery.cookie("preload")==null){ = only try to fill the cache when cookie 'preload' is not found, ie. once per session
jQuery.cookie("preload",1,{path:"/"}) = set the cookie so this routine will not be executed again during this session.

© GeekLabInfo Speed up your website: Preloading and caching images is a post from GeekLab.info. You are free to copy materials from GeekLab.info, but you are required to link back to http://www.geeklab.info

1 Star2 Stars3 Stars4 Stars5 Stars (No Ratings Yet)
Loading...